helyOS Service Layer
This chapter demonstrates more usage examples in terms of helyOS classes by using helyosjs-sdk and Vue.js. Each defined helyOS class has inside methods to implement
CRUD operations. All of methods can be referred from helyOS JavaScript SDK.
After reading and following this page, you will have a single file service layer written by TypeScript. This service layer not only interacts with helyOS, but also store the data
into frontend state management tool Pinia.
helyOS HelyosServices
Firstly, make sure you establish correct connection to helyOS core with HelyosServices.
./services/helyos-service.ts
import { HelyosServices } from 'helyosjs-sdk';
import { useUserStore } from '@/stores/user-store';

// define helyosService
export const helyosService = new HelyosServices('http://localhost', { socketPort: '5002', gqlPort: '5000' });

// login into helyOS core with the defined helyosService
export const helyosLogin = (username: string, password: string) => {
    if (username && password) {
        return helyosService.login(username, password)
            .then(response => {
                return response
            })
    }
}

// build Websocket connection
export const helyosConnect = () => {

    // check if account's login token correct
    const userStore = useUserStore();
    console.log("userStore", userStore.user);

    if (userStore.user.token.jwtToken === helyosService.token) {
        return helyosService.connect()
            .then(connected => {

                // setup helyOS after connection
                helyosSetup();

                return connected;
            })
    }
}

// helyOS setup after connected
const helyosSetup = () => {
    /* Write your code here */
}
Handling Yards
Yard in helyOS represents a delimited region where agents perform their assignments, and it contains map objects. You can easily observe or add/delete yards from helyOS database with helyOS Dashboard by following steps:

Register yards by helyOS dashboard
Go to “Register Yards” view in helyOS Dashboard.
Check all of yards information stored in helyOS database.
Add a new yard by filling in forms or delete existed yards.
Then you can also fetch yards data by helyosjs-sdk, and store yards data into yardStore:
./services/helyos-service.ts
import { HelyosServices } from 'helyosjs-sdk';
import { useYardStore } from '@/stores/yard-store'

// helyOS setup after connected
const helyosSetup = () => {
    listYards(); // fetch yards from helyos
}

////////////////////////////Yards////////////////////////////
// fetch yards from helyos
const listYards = async () => {

    const yardStore = useYardStore();
    const yards = await helyosService.yard.list({});
    console.log("yards", yards);
    yardStore.yards = yards;

}
Handling Map Objects
MapObject is the digital representation of any map object inside the yard. The data type of shapes can be defined by developers, and the common used is JSON/GeoJSON.
helyosjs-sdk provides methods to implement CRUD operations for shapes:
./services/helyos-service.ts
import { HelyosServices, H_MapObject } from 'helyosjs-sdk';

// helyOS setup after connected
const helyosSetup = () => {
    listMapObjects(); // fetch mapObjects from helyos
}

////////////////////////////mapObjects////////////////////////////
// fetch mapObjects from helyos
export const listMapObjects = async () => {
    const mapObjectStore = useMapObjectStore();
    const mapObjects = await helyosService.mapObjects.list({});
    mapObjectStore.mapObjects = mapObjects;
    console.log("mapObjects", mapObjects);
}

// fetch mapObjects from helyos by yard id
const listMapObjectsByYardId = async (yardId: string) => {
    const mapObjectStore = useMapObjectStore();
    const mapObjects = await helyosService.mapObjects.list({ yardId: yardId });
    mapObjectStore.mapObjects = mapObjects;
    console.log(mapObjectStore.mapObjects);
}

// create a new helyos mapObject
export const pushNewMapObject = async (mapObject: H_MapObject) => {
    try {
        const newMapObject = await helyosService.mapObjects.create(mapObject)
        console.log("Push mapObject operation succeed!", newMapObject);
        listMapObjects();
        return newMapObject;
    }
    catch {
        console.log("Push mapObject operation failed!");
    }
}

// delete mapObject by id
export const deleteMapObject = async (mapObjectId: any) => {
    try {
        const deletedMapObject = await helyosService.mapObjects.delete(mapObjectId);
        console.log("Delete mapObject operation succeed!", deletedMapObject);
        listMapObjects();
    }
    catch {
        console.log("Delete mapObject operation failed!");
    }
}
A shape example should be like:

A helyOS map object data structure
The property data can be used to store map objects ( points, lines, polygons, … ).
Retrieving Agent Data
Tool is the digital representation of an agent, which is a device that receives assignments. It has status, position and sensors information of the agent. After installing helyOS Core, there will be three agent simulators running on your device, which means there are three tools data stored in helyOS database. You can also build a custom agent with helyOS Agent SDK. If you go to helyOS Dashboard, you can have a look of all of tools stored in your helyOS database:
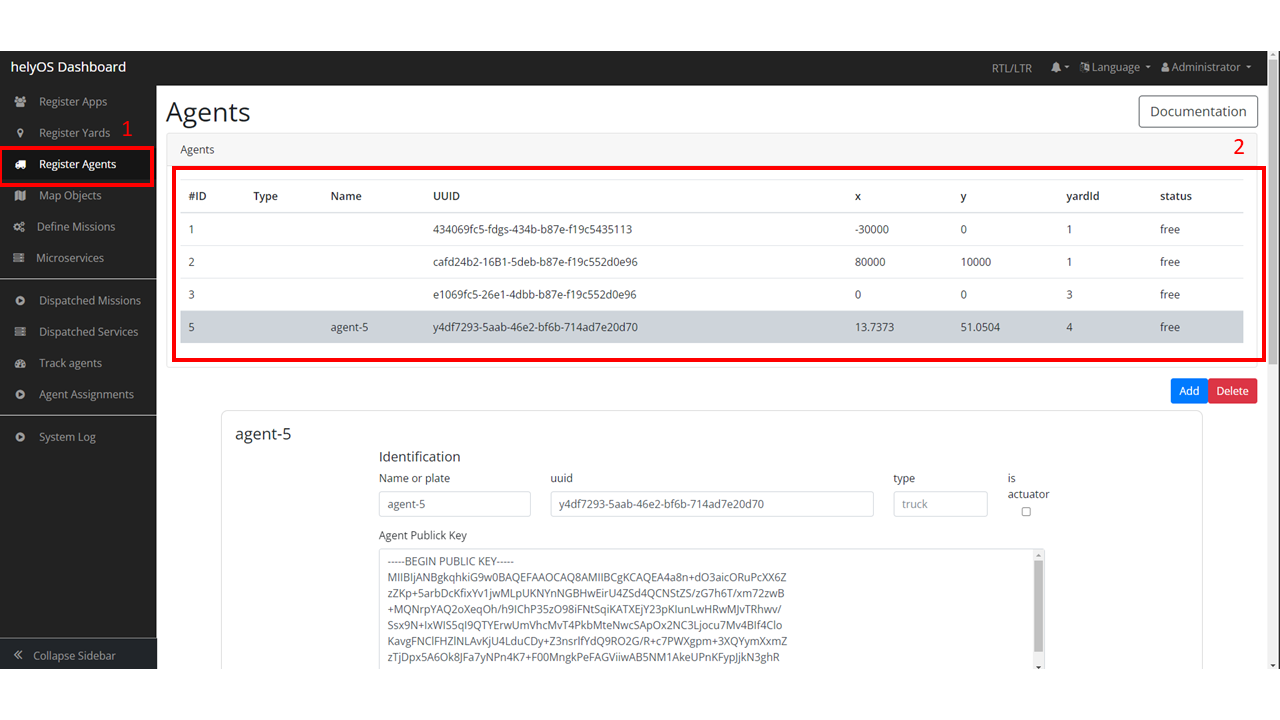
Register agents view of helyOS Dashboard
Go to “Register Agents” view in helyOS Dashboard.
Check, edit, add or delete tools.
Note
Different tools may have different coordinate system! In the above figure shown, the first three tools are trucktrix-map format, which use meter as unit, and the last one is a custom agent, which use decimal latitude and longitude.
You can use helyosjs-sdk interacting with the tools:
./services/helyos-service.ts
import { HelyosServices, H_Agents } from 'helyosjs-sdk';
import { useToolStore } from '@/stores/tool-store';


// helyOS setup after connected
const helyosSetup = () => {
    listTools(); // fetch tools from helyos
    toolSubscription(); // agents listener
}


////////////////////////////Tools////////////////////////////
// fetch tools from helyos
export const listTools = async () => {
    const toolStore = useToolStore();
    const tools = await helyosService.agents.list({})
    toolStore.tools = tools;
    console.log("tools", tools);
    return tools
}

// modify a tool
export const patchTool = (tool: H_Agents) => {
    try {
        const newTool = helyosService.agents.patch(tool);
        console.log("Patch tool operation succeed!", newTool);
        return newTool;
    }
    catch {
        console.log("Patch tool operation failed!");
    }
}

// agents listener
const toolSubscription = () => {
    const socket = helyosService.socket;

    socket.on('new_agent_poses', (updates: any) => {
        console.log('new_agent_poses', updates); // Notifications from tool sensors.
    });
    socket.on('change_agent_status', (updates: any) => {
        console.log('change_agent_status', updates); // Notifications from tools working status.
    });
    socket.on('change_work_processes', (updates: any) => {
        console.log('change_work_processes', updates);  // Notifications from work processes status.
    });
}
With agents listeners, your could track the status and location and agents. As an option, to update status and location information into frontend, you can use the following code:
// agents listener
const toolSubscription = () => {
    const socket = helyosService.socket;
    const toolStore = useToolStore();
    const yardStore = useYardStore();
    socket.on('new_agent_poses', (updates: any) => {

        // console.log('new_agent_poses', updates); // Notifications from tool sensors.
        updates.forEach((agentUpdate: any) => {
            // console.log(agentUpdate);
            const agent = toolStore.tools.find(tool => tool.id === agentUpdate.toolId);
            if (agent) {
                toolStore.ifSubscription = 1;

                if (agentUpdate.yardId === "4")
                {// latitude, longitude based tool
                    agent.x = agentUpdate.x;
                    agent.y = agentUpdate.y;
                    agent.orientation = agentUpdate.orientation;
                    agent.sensors = agentUpdate.sensors;
                    agent.status = agentUpdate.status;
                    agent.dataFormat = "LatLng-vehicle";

                }
                else
                { // trucktrix-map based tool
                    const currentYard = yardStore.yards.find(yard => yard.id === agentUpdate.yardId);
                    const LatLng = helyosService.convertMMtoLatLng(currentYard.lat, currentYard.lon, [[agentUpdate.x, agentUpdate.y]]);

                    agent.x = LatLng[0][1];
                    agent.y = LatLng[0][0];
                    agent.orientation = agentUpdate.orientation;
                    agent.sensors = agentUpdate.sensors;
                    agent.status = agentUpdate.status;
                    agent.dataFormat = "LatLng-vehicle";
                }
            }
        })
        // console.log("tool store", toolStore.tools);

    });
    socket.on('change_agent_status', (updates: any) => {
        console.log('change_agent_status', updates); // Notifications from tools working status.
    });
    socket.on('change_work_processes', (updates: any) => {
        console.log('change_work_processes', updates);  // Notifications from work processes status.
    });
}
As there might be different coordinate units, you can use helyosService.convertMMtoLatLng or helyosService.convertLatLngToMM to convert coordinates.
Creating and Dispatching Missions
WorkProcess is the digital representation of a mission, which is usually originated from the client. The client creates a mission and helyOS uses the microservices to decompose the mission in several assignments. Then assignments are delivered to one or several agents. To create a mission, you have to create a new WorkProcess and insert it into helyOS database. The data inside WorkProcess will be forwarded to microservice linked to the WorkProcessType of mission.
You can define the WorkProcessType in helyOS Dashboard:

Define missions view of helyOS Dashboard
Go to “Define Missions” view in helyOS Dashboard.
Add, edit or delete missions (WorkProcessType).
The mission is stored as WorkProcessType in helyOS database.

Mission (WorkProcessType) view of helyOS Dashboard
Go to defined mission under “Mission Recipes”.
Add, edit or delete new mission recipe.
Link the mission to the microservice by selecting Service Type.

Microservices view of helyOS Dashboard
Go to “Microservices” view in helyOS Dashboard.
The Service Type is selected when defining a mission recipe.
The API Key needed, and the Enabled should be true.
After defining missions and microservices enabled, you can use helyosjs-sdk to get previously defined WorkProcessType in helyOS Dashboard and dispatch new WorkProcess:
./services/helyos-service.ts
////////////////////////////WorkProcess////////////////////////////

import { HelyosServices, H_MapObject, H_Agents, H_WorkProcess } from 'helyosjs-sdk';
import { useWorkProcessStore } from '@/stores/work-process-store';

// helyOS setup after connected
const helyosSetup = () => {
    listWorkProcessType(); // fetch work process type from helyos
}

// fetch work process type from helyos
const listWorkProcessType = async () => {
    const workProcessStore = useWorkProcessStore();
    const workProcessType = await helyosService.workProcessType.list({});
    workProcessStore.workProcessType = workProcessType;
}

// dispatch a new work process
export const dispatchWorkProcess = async (workProcess: H_WorkProcess) => {
    console.log(workProcess);
    return await helyosService.workProcess.create(workProcess)
}
Now, you have a service layer build using helyosjs-sdk, which serves interacting with helyOS database and provides methods for business layer of web app. Besides above usage
examples, you can also build other methods referring to helyOS JavaScript SDK.