Overview
This page assumes you’ve already read the first step on Getting Started. In this chapter, you will learn more features of helyOS and how to develop a web application within helyOS framework. This chapter will start by introducing a frontend framework of helyOS-based application, and more usage examples by using this framework.
Note
Before starting, make sure you have following packages/tools prepared:
helyOS Core
helyosjs-sdk
Leaflet Map
Vue.js and TypeScript support
Frontend Framework

A frontend framework of helyOS-based application
To develop a modern and well-structured web application, this tutorial uses a data-oriented multilayer structure to implement the communications with helyOS Core as above
frontend framework shown. At first, Service Layer serves interactions with helyOS database by helyosjs-sdk, and data will be stored into Pinia store,
which is a popular state management library for Vue.js. Web interfaces controlled by Routing can get data from store and also can inspire services from Service Layer.
helyOS Core and GraphiQL
The helyOS core is a single NodeJS application serving the ports 5000, 5002, and 8080, respectively for the PostGraphile GraphiQL, Websocket connections and dashboard GUI.
helyOS core responds to database events. That is, the creation, update or delete of rows in the database tables trigger actions inside the helyOS core. Therefore the client
applications communicate with helyOS core by interacting with the helyOS database by GraphQL language. During the development of helyOS-based web app, helyOS Dashboard and GraphiQL
are very helpful for developers to observe the data inside helyOS database.
To use Dashboard and GraphiQL, you should login from helyOS Dashboard Login. At your first login time, you can use {username: admin, password: admin}. After login successfully, go to Register Apps page at which you can manage all of application accounts, and create a new account for your web application by following steps:
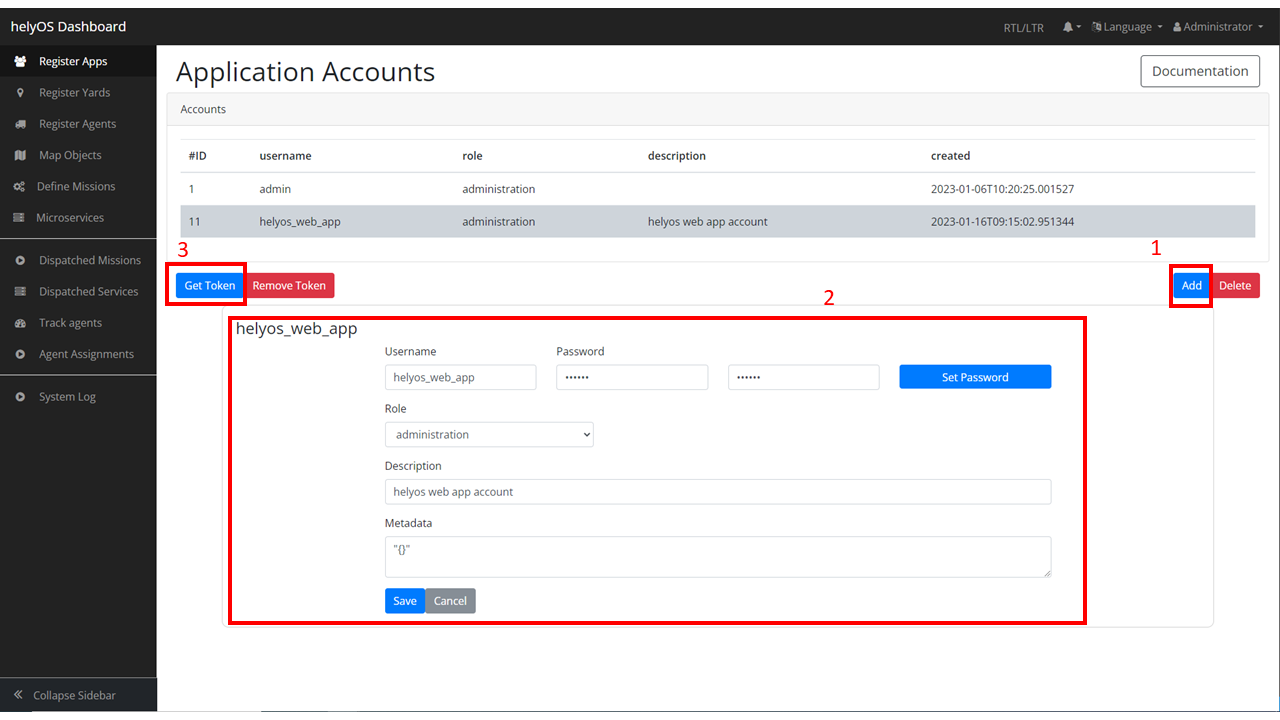
Create a new helyOS app account
Press Add button and press new added account.
Complete account information and press Save button.
Press Get Token button, then you will get the Authorization Token which can be used at GraphiQL.
To view helyOS database by using GraphiQL, with the Authorization Token from helyOS Dashboard, you can query data from helyOS database by following steps:
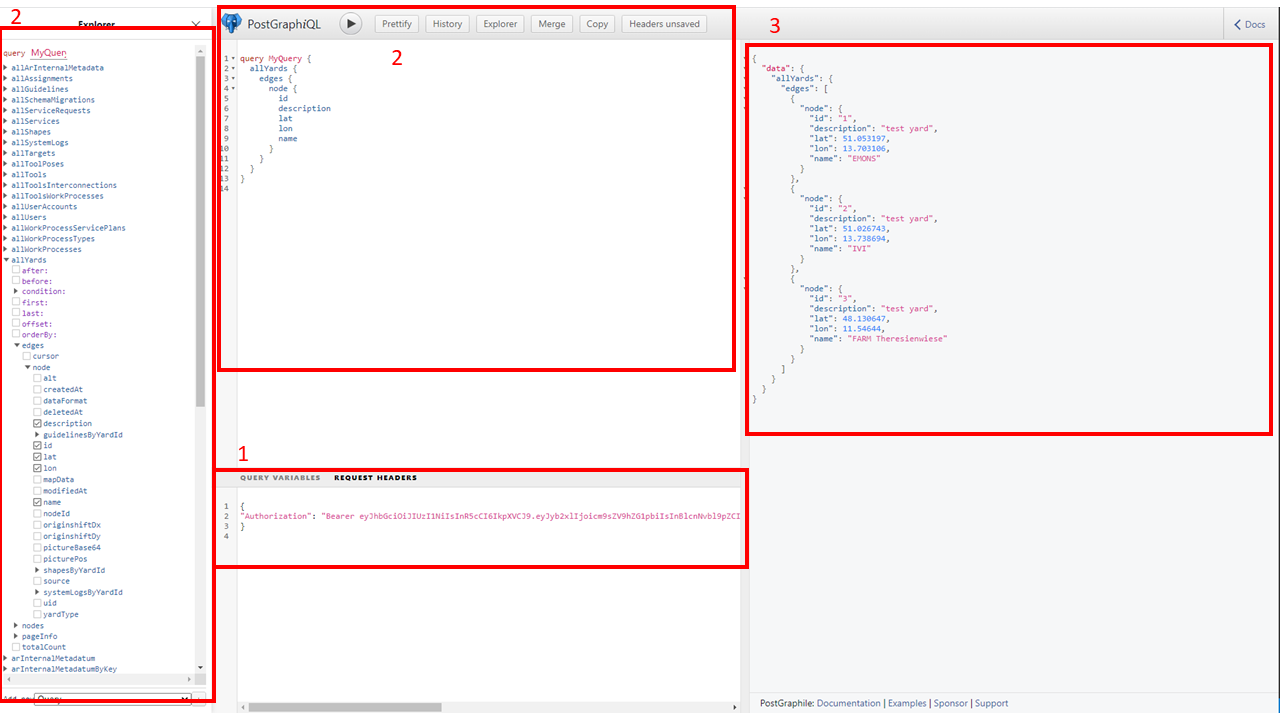
Query data by GraphiQL
Replace {“Authorization”: null} by your Authorization Token.
Query data either by checkbox or by GraphQL Language and press Triangle button.
Queried data will be shown at the right panel.
With these two portals, you can access to all of data stored in helyOS database, which will be helpful for your development process.
Service Layer
This is where the frontend interacts with the backend and provides tools for frontend logics. In our case, all of operations with helyOS will be separated and written in a single
TypeScript file ./services/helyos-service.ts. Here is a basic example how to use service layer by helyosjs-sdk to provide login into helyOS function:
./service/helyos-service.ts
// import helyosjs-sdk package
import { HelyosServices } from 'helyosjs-sdk';
import { useUserStore } from '@/stores/user-store'; // user store will be defined later

// define helyosService object
export const helyosService = new HelyosServices('http://localhost', { socketPort: '5002', gqlPort: '5000' });

// login into helyOS core with the defined helyosService
export const helyosLogin = (username: string, password: string) => {
    if (username && password) {
        return helyosService.login(username, password)
            .then(response => {
                return response
            })
    }
}

// build Websocket connection
export const helyosConnect = () => {

    // check if account's login token correct
    const userStore = useUserStore();
    console.log("userStore", userStore.user);

    if (userStore.user.token === helyosService.token) {
        return helyosService.connect()
            .then(connected => {

                // setup helyOS after connection
                helyosSetup();

                return connected;
            })
    }
}

// helyOS setup after connected
const helyosSetup = () => {
    /* Write your code here */
}
Once you login in successfully, the connection to helyOS core was built by helyosService, and returned response containing the jwtToken of the user.
Besides login function, other operations interacting with helyOS should be written in helyosSetup(), which will be executed after helyosService connected.
State Management
Pinia is a store library for Vue, it allows you to share a state across components/pages. You can install pinia with your
favorite package manager:
> npm install pinia
# or with yarn
> yarn add pinia
Import pinia at ./main.ts:
./main.ts
import { createApp } from 'vue'
import App from './App.vue'
import { createPinia } from 'pinia' // import pinia package

createApp(App)
    .use(createPinia()) // install pinia into your vue app
    .mount('#app')
After installation, you can define a Store in a way similar to a vue component setup(). Here is an example of userStore:
./stores/user-store.ts
import { defineStore } from 'pinia'
import { ref } from 'vue'

// define user type
export type User = { username: string; password: string; token: string};

// define a Store
export const useUserStore = defineStore("user", ()=>{

    // define a user type state
    const user = ref({} as User)

    // define an action that set user's data into userStore
    const setUser = (userInfo: User)=>{
        user.value = userInfo;
    }

    // expose states and actions
    return{
        user,
        setUser
    }
})
And then you use it in a component:
import { ref } from 'vue'
import { useUserStore, type User } from '@/stores/user-store';

// define a user
const userTest = ref({
    username: 'admin',
    password: 'admin',
    token: ''
} as User);

// define the userStore
const userStore = useUserStore();

// use the action from userStore
userStore.setUser(userTest.value);

// print user information at console
console.log("User: ", userStore.user);
It’s better to define different stores respectively for different states depending on demands.
Web Interface and Routing
Vue is a component-based framework, which means a whole page can consist of multiple components. This tutorial will use three components to build an web app:
Login.vue
LeafletMap.vue
Helyos.vue
Vue Router is used with vue.js to make page routing easily. Then this tutorial will use vue-router to implement a router guard
that control the routing between login page and main page based on if helyesToken exists.
Firstly, to install vue-router, use the following command:
> npm install vue-router@4
And import router into ./main.ts:
import { createApp } from 'vue'
import App from './App.vue'
import { createPinia } from 'pinia'
import router from './router' // import router

createApp(App)
    .use(createPinia())
    .use(router)  // install router
    .mount('#app')
Create a new folder ./router and a new typescript file ./router/index.ts:
import { createRouter, createWebHistory } from 'vue-router'
import Login from '../components/Login.vue'
import Helyos from '@/components/Helyos.vue'
import { useUserStore } from '@/stores/user-store';

const routes = [
    {
        path: '/',
        name: 'login',
        component: Login
    },
    {
        path: '/',
        name: 'demo',
        component: Helyos
    }
]

const router = createRouter({
    history: createWebHistory(process.env.BASE_URL),
    routes
})

router.beforeEach((to, from, next)=>{
    const userStore = useUserStore();
    const token = userStore.user.token;
    if(token || to.path === '/'){
        next();
    }else{
        next("/");
    }
})

export default router
Update ./App.vue with the following code:
./App.vue
<script setup lang="ts">
import "./assets/main.css" // main.css
</script>

<template>
    <router-view/>
</template>
./assets/main.css
/* App */
#app {
    /* max-width: 1280px; */
    font-family: Arial, Helvetica, sans-serif;
    font-weight: normal;
    margin: 0;
    padding: 0;
    /* padding: 2rem; */
    background-color:white;
}
Create two different vue components ./components/Login.vue and ./components/Helyos.vue:
./components/Login.vue
<template>
    <div class="login-form">
        <h1>Welcome to helyOS hello-world application</h1>
        <div>Username:
            <input type="text" v-model="loginForm.username" placeholder="user name" />
        </div>
        <div>Password:
            <input type="password" v-model="loginForm.password" placeholder="password" />
        </div>
        <button @click="login">Login</button>
    </div>
</template>

<script setup lang="ts">
import { ref } from 'vue'
import { useUserStore, type User } from '@/stores/user-store';
import { useRouter } from 'vue-router'
import * as HS from '@/services/helyos-service';

// define loginForm
const loginForm = ref({
    username: '',
    password: '',
    token: ''
} as User);

// define userStore
const userStore = useUserStore();
// define router
const router = useRouter();

// login
const login = async () => {

    // login into helyOS and get the helyOS Token
    const helyosToken = await HS.helyosLogin(loginForm.value.username, loginForm.value.password);
    console.log("tk", helyosToken);

    // login in successfully
    if (helyosToken) {
        loginForm.value.token = helyosToken.jwtToken;
        // store user information
        userStore.setUser(loginForm.value);

        // routing to next page
        router.push({
            name: "demo",
        })
    } else {
        alert("Incorrect username or password!")
    }
}

defineExpose({
    login,
})

</script>

<style scoped>
.login-form {
    background-color: lightgray;
    margin: auto;
    width: 50%;
    border: 3px solid green;
    padding: 10px;
    text-align: center;
    /* padding: 20%; */
}

.login-form input {
    margin: 10px;
}

.login-form button {
    margin: 10px;
}
</style>
./components/Helyos.vue
<template>
    <h1>Hello!</h1>
    <div id="mapContainer"></div>
</template>

<script setup lang="ts">
import { ref, onMounted } from 'vue'
import { helyosService } from '@/services/helyos-service';
import "leaflet/dist/leaflet.css";
import L from "leaflet";

const listYard = async () => {

    // initialize helyOS connection and data fetching
    const connected = await helyosService.connect();
    console.log(connected);

    // fetch all of yards
    const yards = await helyosService.yard.list({});
    console.log("yards", yards[0]);

    // initiate the map
    initMap(yards[0].lat, yards[0].lon);

    return yards;
}

const initMap = (originLat: any, originLng: any) => {
    const leafletMap = L.map("mapContainer").setView([originLat, originLng], 17);
    // map layer
    L.tileLayer('https://tile.openstreetmap.org/{z}/{x}/{y}.png', {
        maxZoom: 19,
        attribution: '© OpenStreetMap'
    }).addTo(leafletMap);
}

onMounted(() => {
    listYard();
})
</script>

<style scoped>
#mapContainer {
    height: 600px;
    width: 800px;
}
</style>
Now run the project with npm run dev, you will see the helyOS login interface routed from ./components/Login.vue. Then you can login in with the username and password
which are stored in helyOS Dashboard, and you will see the page routed from ./components/Helyos.vue. Once you refresh the browser, it will go to login interface again.
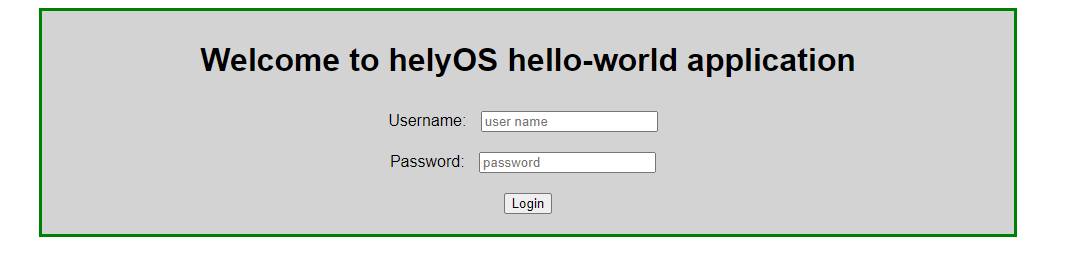
helyOS login interface

helyOS after-login interface
Now you have prepared everything you need to build an web app within helyOS framework. From this point, you can either start building your own app or keep following the rest parts of this tutorial to learn more features.
Complete Project Tree
A complete project tree of this tutorial is shown below:
.
└── project/
    ├── src/
    │   ├── App.vue
    │   ├── main.ts
    │   ├── assets // static resources
    │   ├── components/
    │   │   ├── Login.vue // login interface
    │   │   ├── leafletMap.vue // contains leaflet map view and all of leaflet api
    │   │   └── Helyos.vue // main conponent, displays tools, shapes, yards, workprocess and map
    │   ├── router/
    │   │   └── index.ts // guide the pages
    │   ├── services/
    │   │   └── helyos-service.ts // helyos sdk api
    │   └── store/
    │       ├── leaflet-map-store.ts // stores map ref()
    │       ├── shape-store.ts // stores shapes and provides push, delete shape operations
    │       ├── map-object-store.ts //stores tools and status information
    │       ├── user-store.ts // stores user information and jwtToken
    │       ├── work-process-store.ts // stores work process type and dispatch new work process
    │       └── yard-store.ts // stores yard information
    ├── public
    ├── docker-compose.yml
    ├── dockerfile
    ├── env.d.ts
    ├── index.html
    ├── package-lock.json
    ├── package.json
    ├── README.md
    ├── tsconfig.config.json
    ├── tsconfig.json
    └── vite.config.ts
Keep going, you will continue to complete your own project by learning more detailed operations interacting with helyOS.